Influxdb 2.0 lessons learned

I played a bit with influxdb version 2.0.0, telegraf client and two of my raspberry pies.
On my oldest pi  a 1 B+ the telegraf client caused too much performance issues on that light weight single CPU and 480 MB of usable RAM. So I chose a simple bash script with curl to send the CPU temperature to influxdb.

#!/bin/bash
timestamp=$(date +%s)
temp=$(vcgencmd measure_temp)
curl -XPOST \
"https://flux.example.com/api/v2/write?org=none&bucket=pihole&precision=s" \
--header "Authorization: Token asas==" \
--data-raw "cpu-temperature,host=pihole ${temp//\'C/} ${timestamp}"

At first I was running influxdbd by hand. But I didn’t want the usual port of 9999 of the alpha version and I also wanted SSL encryption when I log into the backend. Pretty easy with the already running apache on that server.

<VirtualHost *:443>
	ServerName flux.example.com
	DocumentRoot /var/www/empty

	<Directory /var/www/empty>
		Options Indexes FollowSymLinks
		AllowOverride None
		Require all granted
	</Directory>

	ProxyPass / http://localhost:9999/
	ProxyPassReverse / http://localhost:9999/

	SSLEngine on
	SSLCertificateFile  fullchain.pem
	SSLCertificateKeyFile privkey.pem
</VirtualHost>

so far so good. Starting the influxdb by hand after a reboot or failing isn’t an option.  So I created by on systemd service file

sudo $EDITOR /lib/systemd/system/influxdb2.service

[Unit]
Description=InfluxDB 2.0 service file.
Documentation=https://v2.docs.influxdata.com/v2.0/get-started/
After=network-online.target

[Service]
User=influx
Group=influx
ExecStart=/usr/local/bin/influxd
Restart=on-failure

[Install]
WantedBy=multi-user.target

Do not forget to enable it :D sudo systemctl enable influxdb2


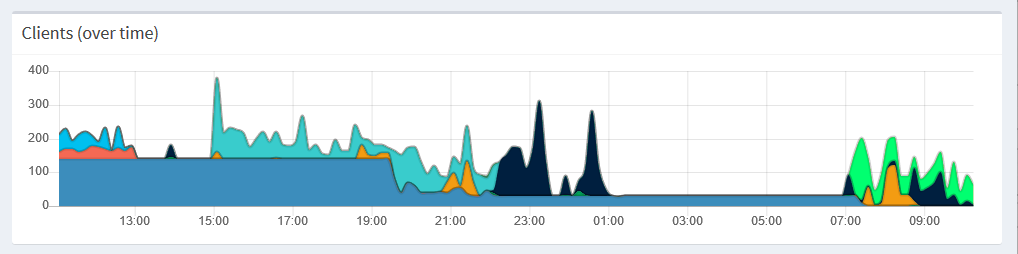
So far I made one observation. The telegraf client is doing a lot of DNS requests through the network. If I’m not wrong it does it for every request. If you look at the graphic you see that the bottom a big blue line. That is the DNS requests from telegraf. At some point around 20:00 You see a drop. Well there I change the flush interval to 120 seconds. Later at round 7:30 I wrote the IP and host name into /etc/hosts and the “noise” was gone. That is something you maybe want to do in your devices, too to save some bandwidth and energy.

CISCO router password recovery

– Attach a terminal or PC with terminal emulation to the console port of the router.
Use these terminal settings:

* 9600 baud rate
* No parity
* 8 data bits
* 1 stop bit
* No flow control
– If you can access the router, type show version at the prompt, and record the configuration register setting. See Example of Password Recovery Procedure in order to view the output of a show version command
Note: The configuration register is usually set to 0x2102 or 0x102. If you can no longer access the router (because of a lost login or TACACS password), you can safely assume that your configuration register is set to 0x2102.


– Press **Break** (**Ctrl-Break** Windows XP) on the terminal keyboard within 60 seconds of power up in order to put the router into ROMMON.
– Type **confreg 0x2142** at the rommon 1> prompt in order to boot from Flash. This step bypasses the startup configuration where the passwords are stored.
– Type **reset** at the rommon 2> prompt. The router reboots, but ignores the saved configuration.
– Type **no** after each setup question, or press **Ctrl-C** in order to skip the initial setup procedure.
– Type **enable** at the Router> prompt. You are in enable mode and should see the Router# prompt.
– Type **configure memory** or **copy startup-config running-config** in order to copy the nonvolatile RAM (NVRAM) into memory. **Important**: Do not type **copy running-config startup-config** or **write**. These commands erase your startup configuration.
– Type **show running-config**. The **show running-config** command shows the configuration of the router. In this configuration, the **shutdown** command appears under all interfaces, which indicates all interfaces are currently shut down. In addition, the passwords (enable password, enable secret, vty, console passwords) are in either an encrypted or unencrypted format. You can reuse unencrypted passwords. You must change encrypted passwords to a new password.
– Type **configure terminal**.
– The hostname(config)# prompt appears.
– Type **enable secret <password>** in order to change the enable secret password. For example: hostname(config)#**enable secret cisco**
– Issue the **no shutdown** command on every interface that you use. If you issue a **show ip interface brief** command, every interface that you want to use should display up up.
– Type **config-register <configuration_register_setting>**. Where **configuration_register_setting** is either the value you recorded in step 2 or **0x2102** . For example: hostname(config)#**config-register 0x2102**
– Press **Ctrl-z** or **end** in order to leave the configuration mode. The hostname# prompt appears.
– Type **write memory** or **copy running-config startup-config** in order to commit the changes.

vim

normal mode

  • [count]operation[count]{motion}
  • :q! = quit without saving
  • :x = :wq == write and quit
  • dd or D = delete line
  • d7d = delete the next 7 lines
  • . = repeat the last command
  • CTRL + o = back to last cursor position
  • p = insert (from register) / paste in line below cursor
  • P = paste obove cursor- :reg = list registers
  • "1p = paste from register 1
  • "+y = copy into system clipboard
  • "+p = pate from system clipboard
  • u = undo
  • CTRL + R = redo
  • i = enter insert mode
  • v = enter visual mode
  • y = yank / copy what was selected
  • yy = yank / copy line
  • 4yy = yank 4 lines
  • >> = indent- &lt;&lt; = unindent
  • :E = open file explorer (works only with set nocompatible)
  • :bd = buffer delete / close buffer
  • :bn = goto next buffer
  • :bp = previous buffer
  • :ls = list of buffers
  • * = Find word unter cursor- :%s/search/replace/g g for global
  • :%!column -t spaces to columns
  • $ = goto the end of the line
  • x = delete charater under cursor
  • w = goto next word
  • dw = delete next word
  • 0 = goto start of line
  • z ENTER move view to line
  • :terminal Open Terminal in split view
  • :set rightleft right to left (exit with :set rightleft&)
  • :edit! reload file without saving or :e!
  • :set nowrap
  • :set wrap
  • :set nu Show line numbers. Reverse with nonu
    :setlocal cm=blowfish2
  • :X
  • h j k l = move cursor ( h: ← j: ↓ k: ↑ l: →
  • :sp = split screen (same file)
  • :sp filename = open other file
  • :vsp = vertical split
  • CTRL + w CTRL + w = switch between splits
  • :hide = close current window
  • :only = keep only this window
  • :help holy-grail = advanced help
  • :set rightleft = some fun

Search/Replace

  • R = enter replace mode- /pattern – search for pattern
  • ?pattern – search backward for pattern
  • n – repeat search in same direction
  • N – repeat search in opposite direction
  • :%s/old/new/g – replace all old with new throughout file
  • :%s/old/new/gc – replace all old with new throughout file with confirmations

insert mode

  • CTRL + n CTRL + p = Complete word
  • CTRL + x CTRL + l = Complete line
  • CTRL + r = insert register
  • 80i * ESC = insert 80 *
  • 5o # ESC = insert 5 rows starting with #
change EOL / line ending
  • :set ff=unix= set to unix line endings
  • How to jump back to NERDTree from file in tab
    ctrl-ww

INSERT
you can insert text from your host’s clipboard by pressing the right mouse button (default setting) or by pressing Shift + Ins. Note that this has the same effect as entering every character manually. So if you are using auto indentation in vim, this will very likely screw up your code.
To fix that, you can do the following:
Before pasting into vim, enable paste mode by entering :set paste.Press I to enter insert mode. The status bar should say -- INSERT (paste) -- now.Press Shift + Insert (The auto indentation of vim should not happen.)Press Esc to leave insert mode, and disable paste mode using :set nopaste again.

How to delete all lines of file in Vim
Type gg to move the cursor to the first line of the file, if it is not already there.Type dG to delete all the lines.

SSH Tricks

This is more for me than others. Sometimes I forget things like this.

SSH Dynamic Socks Proxy for the browser.

ssh -D 8888 [email protected]
Browser: Socks Proxy localhost 888

SSH Tunnel to another host

ssh -L 9090:localhost:9090 user@proxyhost -i SSHKEY ssh -L 9090:localhost:9090 -N user@TARGETSYSTEM

Also SSH Tunnel Bypassing Transparent proxy using apache

Honor / huawei phone disable / remove huawei search

1) Download ADB
2) Enable USB Debugging on your device
3) Connect to computer and verify your device is listed with command “adb devices”
4) Type “adb Shell”
5) Type “pm list packages”, this will show you all packages installed on phone.
6) Type “pm uninstall -k –user 0 com.huawei.search”
7) you should see the word “Sucess” pop up
Well I removed some more bloat ware
adb devices
adb Shell
pm list package
pm list package | grep "huawei"
pm uninstall -k --user 0 com.huawei.search
pm uninstall -k --user 0 com.huawei.appmarket
pm uninstall -k --user 0 com.huawei.himovie.overseas
pm uninstall -k --user 0 com.huawei.android.mirrorshare
pm uninstall -k --user 0 com.huawei.tips
pm uninstall -k --user 0 com.huawei.wallet
pm uninstall -k --user 0 com.facebook.services
pm uninstall -k --user 0 com.facebook.appmanager
pm uninstall -k --user 0 com.facebook.system
pm uninstall -k --user 0 com.google.android.feedback
pm uninstall -k --user 0 com.huawei.android.karaoke
pm uninstall -k -–user 0 com.huawei.hifolder
pm uninstall -k --user 0 com.huawei.hwdetectrepair
pm uninstall -k --user 0 com.huawei.phoneservice
pm uninstall -k --user 0 com.huawei.hwid
pm list package | grep -v "google" | grep -v "huawei" | grep -v "com\.android"
pm list package huawei
pm list packages | grep "huawei" | sort

How to paste / insert in vim from clipboard

When ever I tried to insert text from the clipboard to vim it did either not work at all or the lines were inserted like a tree, each line more indented.

To fix that, you can do the following:
Before pasting into vim, enable paste mode by entering :set paste.
Press I to enter insert mode. The status bar should say — INSERT (paste) — now.
Press Shift + Insert (The auto indentation of vim should not happen.)
Press Esc to leave insert mode, and disable paste mode using :set nopaste again.
This works from windows terminal, putty, linux terminal and WSL.

http/2.0 sslciphersuites with 256 bit alias crypto wars part eight TLSv1.3

Now with the release of Apache 2.4.37 it supports TLSv1.3 (with OpenSSL 1.1.1). Before is was possible to compile Apache against OpenSSL 1.1.1 but it had no effect compared to OpenSSL 1.1.0

There are some advantages using TLS 1.3. it comes with Zero Round Trip Time (0-RTT). Explained simply, with TLS 1.2, two round-trips had been needed to complete the TLS handshake. With TLSv1.3, it requires only one round-trip, which in turn cuts the encryption latency in half. It feels faster.

At the moment only Chrome and Firefox support TLS 1.3. But I think other browser will follow soon.

This requires Apache 2.4.37 or better and OpenSSL 1.1.1 or better. Note that there are now two different directives for SSLCipherSuite. Also new is that the names for the Ciphers for TLS 1.3 are  directly taken from the OpenSSL internal naming. This is different compared to the old way in apache. Only two ciphers that are allowed for TLSv1.3 support 256 bit encryption that is why I chose those.

Listen 443
<If "%{SERVER_PORT} == '443'">
<IfModule mod_headers.c>
Header always set Strict-Transport-Security "max-age=15553000; preload"
</IfModule>
</If>

ProtocolsHonorOrder On
Protocols h2c h2 http/1.1

TraceEnable Off

SSLUseStapling On
SSLSessionCache shmcb:/opt/apache2/logs/ssl_gcache_data(512000)
SSLStaplingCache shmcb:/opt/apache2/logs/ssl_stapling_data(512000)
SSLOptions +StrictRequire +StdEnvVars -ExportCertData
SSLProtocol -all +TLSv1.2 +TLSv1.3
SSLCompression Off
SSLHonorCipherOrder On
SSLCipherSuite SSL ECDHE-ECDSA-CHACHA20-POLY1305:ECDHE-RSA-AES256-GCM-SHA384:ECDHE-RSA-AES256-SHA384:ECDHE-RSA-AES256-SHA:DHE-RSA-AES256-GCM-SHA384:DHE-RSA-AES256-SHA256:DHE-RSA-AES256-SHA
SSLCipherSuite TLSv1.3 TLS_CHACHA20_POLY1305_SHA256:TLS_AES_256_GCM_SHA384

SSLOpenSSLConfCmd DHParameters "/opt/apache2/conf/dh4096.pem"
SSLOpenSSLConfCmd ECDHParameters secp384r1
SSLOpenSSLConfCmd Curves sect571r1:sect571k1:secp521r1:sect409k1:sect409r1:secp384r1:sect283k1:sect283r1:secp256k1:prime256v1

H2Direct On

Sadly not OS Distributions support the last OpenSSL version or that TLv1.3 version has been backported or it has been patched, but apache shows still an older version number.

git cheat sheet

Delete all local branches but master and the current one

git branch | grep -v "master" | grep -v ^* | xargs git branch -D;

what did I do? aka git last commit

git diff @~..@

What did I do the last week?

git log --stat --since='1 Week Ago' --graph --pretty=oneline --abbrev-commit --date=relative

git log only the relevant merges

git log --all --graph --decorate --oneline --simplify-by-decoration

show all untracked files

git ls-files --others --exclude-standard

last tag

describe --tags --abbrev=0

Posts Tagged linux

Archives by Month: